Build a neovim menu without external dependencies
Wow, it’s been quite a long time since my last post. I’m still a vim addict, but I moved to neovim in the recent years, and today I wanna share a quick trick that you might find useful.
I’m going to build a custom interactive menu with custom options. I’ll use it to access some files whose location I often forget, but you’ll see how easy it is to customize it to do anything you want. And the best part is, you don’t need any external plugin to use it :)
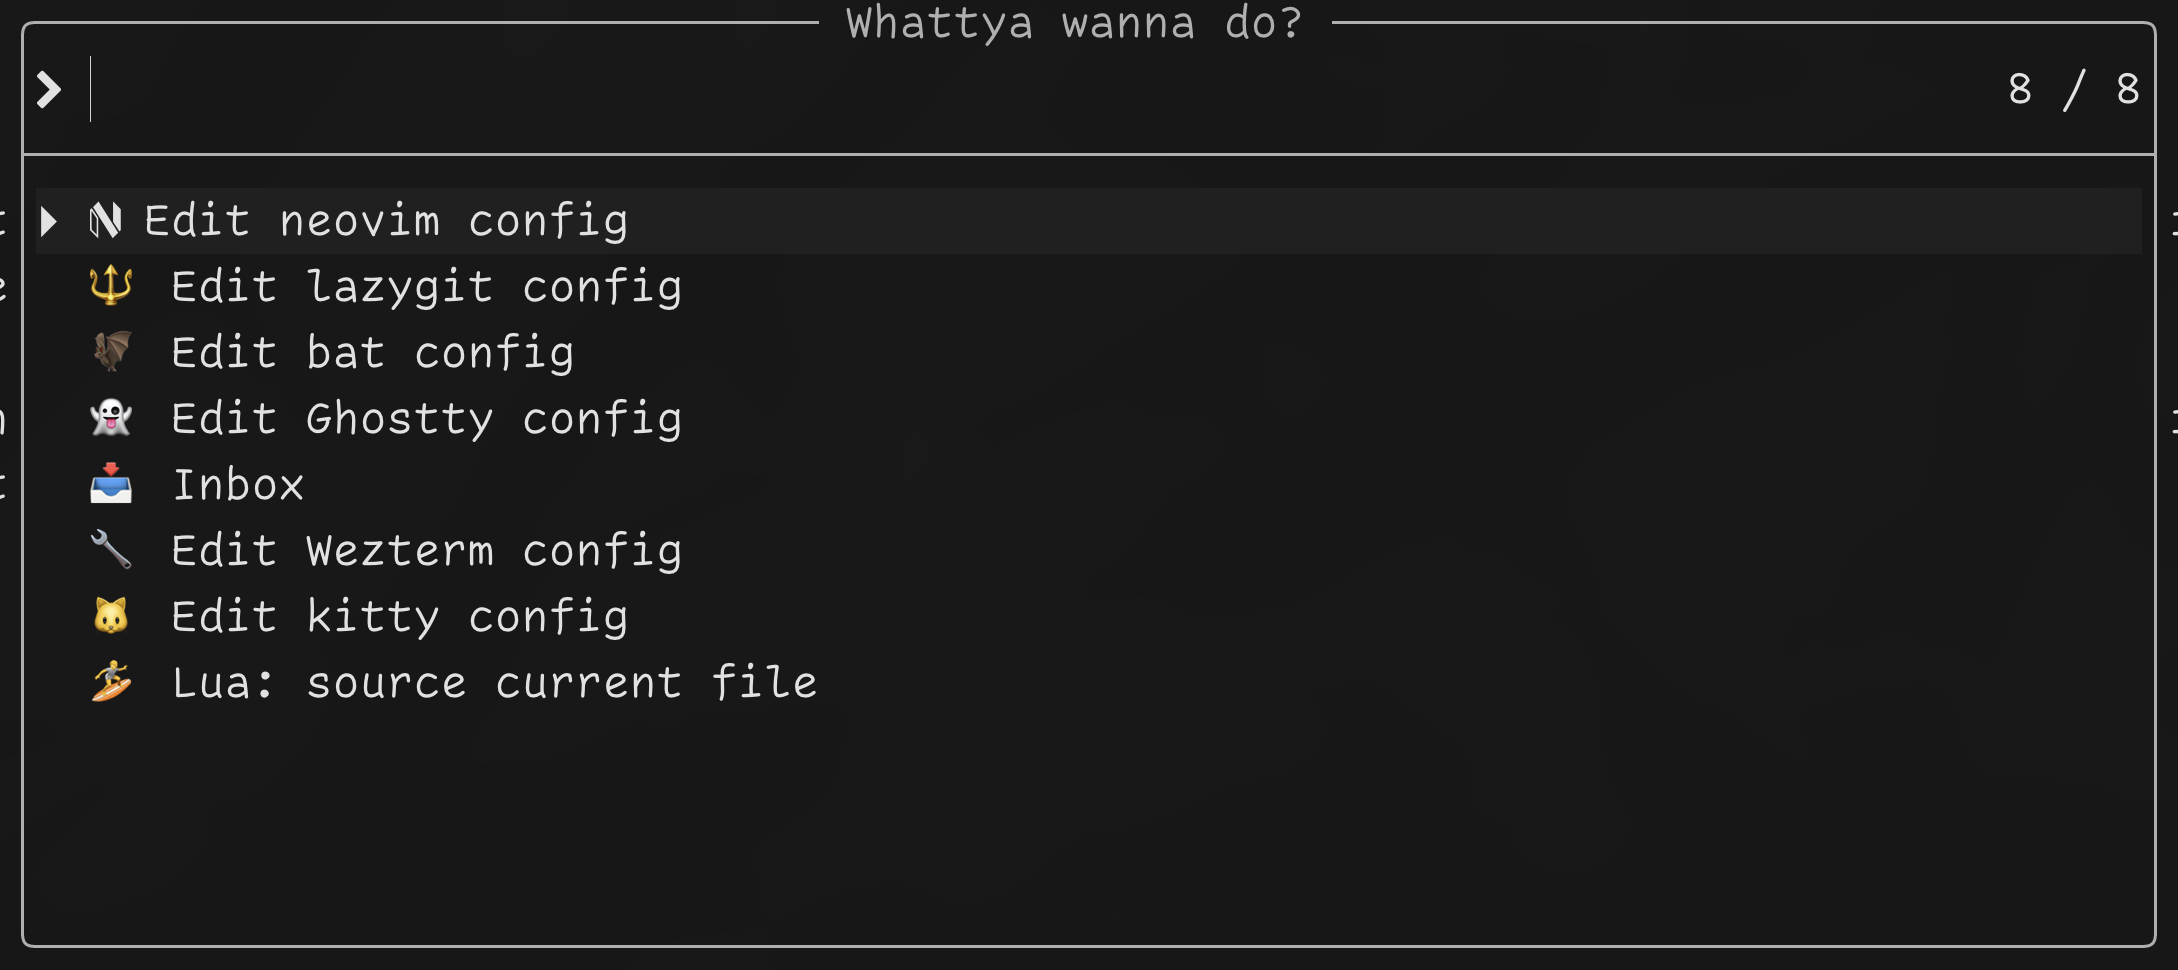
Here’s an example of how it’s looking:
And here’s the code, which I’ll explain line by line:
1
2
3
4
5
6
7
8
9
10
11
12
13
14
15
16
17
18
19
20
21
22
23
24
25
26
27
28
29
30
31
32
33
34
35
36
37
38
39
40
41
42
43
44
45
46
47
48
49
50
51
52
53
54
55
56
57
58
59
60
61
local M = {}
local core = require("lib/core")
M.commands = {}
M.commands.EditNeovimConfig = {
command = ":e " .. core.get_configdir() .. "/init.lua",
description = " Edit neovim config",
}
M.commands.EditBatConfig = {
command = ":e ~/.config/bat/config",
description = "🦇 Edit bat config"
}
M.commands.EditInbox = {
command = ":e ~/iCloud-Obsidian/work/inbox.md",
description = "📥 Inbox"
}
M.commands.EditKittyConfig = {
command = ":e ~/.config/kitty/kitty.conf",
description = "🐱 Edit kitty config"
}
M.commands.EditLazygitConfig =
{
command = ":e ~/Library/Application Support/lazygit/config.yml",
description = "🔱 Edit lazygit config"
}
M.commands.EditWeztermConfig =
{
command = ":e ~/.config/wezterm/wezterm.lua",
description = "🔧 Edit Wezterm config"
}
M.commands.EditGhosttyConfig = {
command = ":e ~/.config/ghostty/config",
description = "👻 Edit Ghostty config"
}
M.commands.SourceCurrentLuaFile = {
command = ":luafile %",
description = "🏄 Lua: source current file"
}
M.run = function()
vim.ui.select(vim.tbl_keys(M.commands), {
prompt = "Whattya wanna do?",
format_item = function(item)
return M.commands[item].description
end,
}, function(choice)
local chosen_command = M.commands[choice]
vim.cmd(chosen_command.command)
end)
end
return M
This is a classic Lua module. I saved it under lua/user/quick-menu.lua in my neovim config dir.
To show the available commands, get the user input and execute the chosen command, we’re going to use the vim.ui.select function from neovim.
As you can see in the documentation (:h vim.ui.select()), here’s what this function does:
1
2
3
vim.ui.select({items}, {opts}, {on_choice})                  *vim.ui.select()*
    Prompts the user to pick from a list of items, allowing arbitrary
    (potentially asynchronous) work until `on_choice`.
The documentation also gives us an example:
1
2
3
4
5
6
7
8
9
10
11
12
vim.ui.select({ 'tabs', 'spaces' }, {
    prompt = 'Select tabs or spaces:',
    format_item = function(item)
        return "I'd like to choose " .. item
    end,
}, function(choice)
    if choice == 'spaces' then
        vim.o.expandtab = true
    else
        vim.o.expandtab = false
    end
end)
So, we need:
- a set of options to be picked (in the example,
tabsandspaces); - a
format_itemfunction that takes an item as an input and returns a string description of the option; - a function to be executed once
choicehas been picked.
If we have just a couple options, it’s fine to inline them as in the example; but if we need something more complicated, like in our menu, a custom data structure will be handy. So, we’re going to define a M.commands table, where each row will include the command to be executed when chosen, and the description to be displayed to the user.
Our module will also expose a run method that will be responsible of calling vim.ui.select and bind our table to make everything work.
Let’s look at the run method again:
1
2
3
4
5
6
7
8
9
10
11
M.run = function()
	vim.ui.select(vim.tbl_keys(M.commands), {
		prompt = "Whattya wanna do?",
		format_item = function(item)
			return M.commands[item].description
		end,
	}, function(choice)
		local chosen_command = M.commands[choice]
		vim.cmd(chosen_command.command)
	end)
end
The list of available options to be displayed can be extracted from the M.commands table with vim.tbl_keys, an utility function that extracts keys from a lua table. This will return the list of keys in the M.commands table, so EditNeovimConfig, EditKittyConfig and so on.
The next step is to write the format_item function, that will take an item (e.g. EditNeovimConfig) and will need to return its description. It’s pretty easy, as we just need to read the M.commands[item] row and get its description.
Finally, once the user has picked a command, we need to execute it. Every command in our M.commands is a vimscript command that can be executed with the vim.cmd shorthand, so reading it and executing is pretty straightforward.
Now that everything is in place, we just need to setup a key binding to trigger the menu. I have this under <Leader>hL, and here’s how to do it:
1
2
3
vim.keymap.set("n", "<leader>hL", function()
	require("user.quick-menu").run()
end, { desc = "Quick menu" })
Put this in any neovim config file, restart neovim and you will be ready to go!
I hope everything is clear, feel free to ask in the comments below if you need any further info.
Thanks for your time!